1. Starting a new component
Warning
DO NOT CLOSE the terminal in-between each step.
After inspecting the mic.yml file in-between steps, CLOSE the file.
In this step, MIC will assist you in creating a computational environment based on the executables present in your working directory and a template MIC file (mic.yaml) which will be placed in a /mic directory. This file (which will be completed in subsequent steps) contains the executable information and metadata about your software component.
MIC command
To run this step, you must cd to the folder in which the software can be executed. Please make sure that all the information needed for executing your software exists in this folder (including data, executable scripts, etc.). You don't need to create any special folder structure, just use the same file structure you would normally use to execute your component.
For example, let us consider a simple java model that reads an input file. In order to test it with MIC, we have prepared a sample input file (input.txt), which we placed in the same folder as my executable:
$ ls
input.txt  test_192-1.0-SNAPSHOT-jar-with-dependencies.jar
Creating an image through MIC
If you want to use MIC to create an image for you automatically, use the following command:
$ mic pkg start
Model component name: test_192
MIC has initialized the component.
[Created] data:      C:\Users\dgarijo\Desktop\192\java_model\mic\data
[Created] docker:    C:\Users\dgarijo\Desktop\192\java_model\mic\docker
[Created] src:       C:\Users\dgarijo\Desktop\192\java_model\mic\src
[Created] mic.yaml:  C:\Users\dgarijo\Desktop\192\java_model\mic\mic.yaml
C:\Users\dgarijo\Desktop\192\java_model\mic\mic.yaml created
You can disable the detection of dependencies using the option --no-dependencies
Dockerfile has been created: C:\Users\dgarijo\Desktop\192\java_model\mic\docker\Dockerfile
Downloading the base image and building your image
Step 1/1 : FROM mintproject/java:8

 ---> 4950fcaa2d0d
Successfully built 4950fcaa2d0d
Successfully tagged test_192:latest

You are in a Linux environment Debian distribution
We detect the following dependencies.

- If you install new dependencies using `apt` or `apt-get`, remember to add them in Dockerfile mic\docker\Dockerfile
- If you install new dependencies using python. Before the step `upload` run:

pip freeze > mic/docker/requirements.txt

Please, run your Model Component.
Warning
This command must NOT be executed on a folder already tracked by GitHub.
Creating your own image
You may already have a Docker image for your software or you may need to create one if you have complex dependencies (for instance, mix of conda and pip). MIC allows you to use your own image.
For tutorials on creating docker images, see the Docker website.
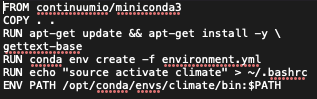
If you are using Anaconda, the easiest method is to export your conda environment to a .yml file and use a DockerFile to build the image. Below is an example of a DockerFile to build an image from the base Miniconda image. The subsequent commands create a new environment requiring Python 3.8 and all other dependencies contained in the environment.yml file. The last command opens up the container for the image in the right environment.
Then use the following command to direct MIC towards your image:
$ mic pkg start --name [yourname] --image [imagename]
$ mic pkg start --name drought --image dsiv1.2.0
You should get the following results:
MIC has initialized the component.
[Created] data:      /Users/deborahkhider/Documents/MINT/Drought/ForMIC2/mic/data
[Created] docker:    /Users/deborahkhider/Documents/MINT/Drought/ForMIC2/mic/docker
[Created] src:       /Users/deborahkhider/Documents/MINT/Drought/ForMIC2/mic/src
[Created] mic.yaml:  /Users/deborahkhider/Documents/MINT/Drought/ForMIC2/mic/mic.yaml
/Users/deborahkhider/Documents/MINT/Drought/ForMIC2/mic/mic.yaml created
Using default tag: latest
Downloading the base image and building your image
Step 1/4 : FROM dsiv1.2.0

 ---> 091f544d11b8
Step 2/4 : COPY entrypoint.sh /set_umask.sh

 ---> 42aa41d755cb
Step 3/4 : RUN chmod +x /set_umask.sh

 ---> Running in 376c2e4304d6
 ---> 4270eb9cf0f0
Step 4/4 : ENTRYPOINT ["/set_umask.sh"]

 ---> Running in 74c8ef789627
 ---> 49d4a9636391
Successfully built 49d4a9636391
Successfully tagged drought:latest

    You are using a custom image
    You must install mic and reprozip
    $ pip3 install mic reprozip
Warning
Do not forget to install MIC in your image with pip install mic for the next steps.
Expected Results
After executing the previous command, MIC creates a mic directory with three sub-directories and a MIC file (mic.yaml):
- data/: folder for the input data (should be empty).
- src/: folder for code and MIC wrapper (i.e., the file that executes your code). This folder should be empty at this stage. In the next step, you are going to specify how to run your model in the command line. MIC will capture all the required information automatically.
- docker/: It contains the required files to create the Docker Image (should not require further modifications). In later steps, MIC will populate this directory with the files that are needed to capture your computational infrastructure.
The MIC file will have a few lines at the moment, capturing the dependencies of the current environment:
step: 1
name: test_192
docker_image: dgarijo/test_192:20.6.1
framework:
  - java8
  - mintproject/java:8
  - .jar
MIC will also redirect you to the container. The command line path should look something like this:
root@4914deed9c58:/tmp/mint#
Note: If you are using a conda environment, the name of the environment will show up before the path:
(climate) root@4914deed9c58:/tmp/mint
Help command
Usage: mic pkg start [OPTIONS] USER_EXECUTION_DIRECTORY

  This step generates a mic.yaml file and the directories (data/, src/,
  docker/). It also initializes a local GitHub repository

  The argument: `model_configuration_name` is the name of the model
  component you are defining in MIC

Options:
  --name TEXT   Name of the model component you want for your model
  --image TEXT  (Optional) If you have a DockerImage, you can use it
  --help        Show this message and exit.